
Free Software Download Center
Software for industrial data collection,
monitoring, and analysis.
EDITING THE CREATED SCREEN
After creating a new SCADA screen in EOS SCADA Editor and defining its basic properties, the screen needs to be visually arranged in order to transform it into an actual monitoring and operation screen.
During the screen editing stage, user control objects are placed on the screen, and their size, position, and visual properties are defined. When required, objects can be linked to SCADA data points so that real-time data can be monitored visually or audibly on the screen.
EOS SCADA Editor provides three different editing modes to allow screen design to be performed according to different working requirements. The user can select the most appropriate editing mode according to the nature of the design task being performed.

One of the following three editing modes can be used to perform screen editing operations in EOS SCADA Editor:
All three modes allow the same SCADA screen to be designed. The main difference between them is how the screen is displayed within the EOS SCADA Editor workspace and how other design tools are accessed.
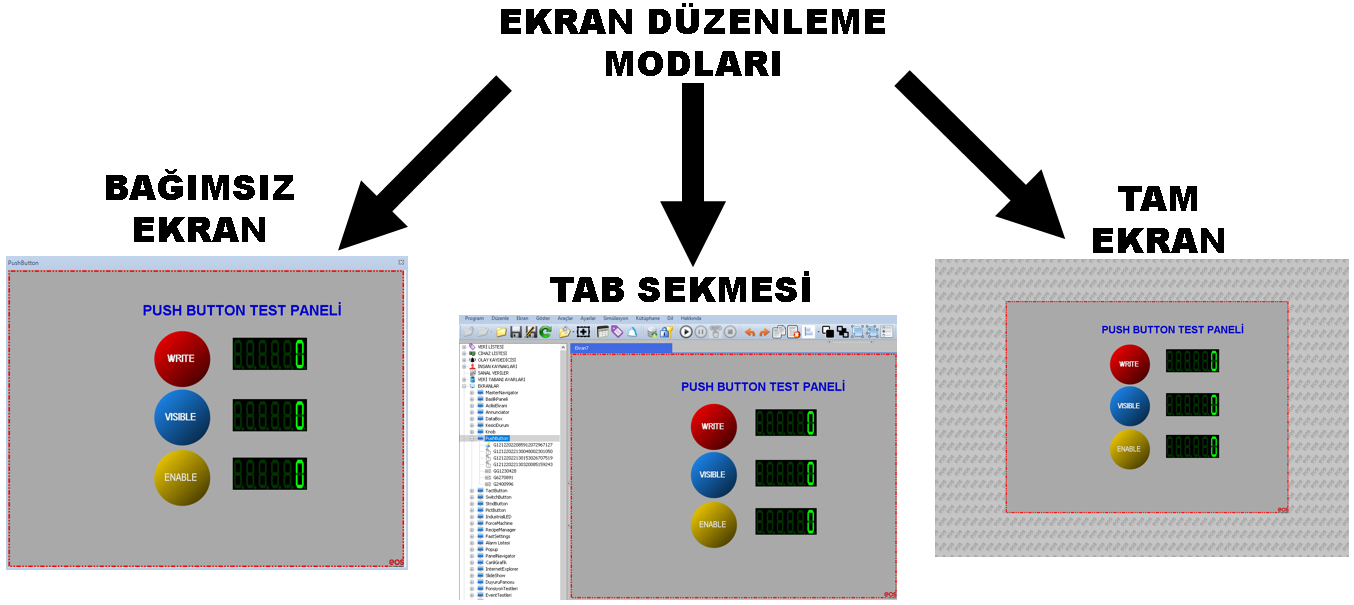
Especially when designing screens containing a large number of user control objects whose properties are frequently modified, selecting the most appropriate working mode can make the design process easier for the user.
To edit a SCADA screen in an independent window, double-click the screen name with the left mouse button under the SCREENS menu item in the tree menu on the left.
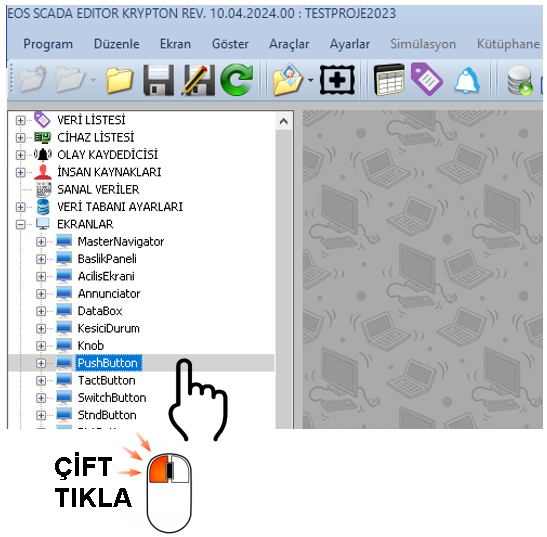
After double-clicking, the selected screen opens in a separate window independent of the main design area. Using this window, the user can edit objects on the screen, add new objects, and modify the properties of existing objects.
Although the screen is displayed in a separate window in Independent Screen Mode, the tree menu on the left and the settings table on the right can continue to be used.
Usage: Double-clicking the screen name under SCREENS opens the screen in an independent editing window.
To open a SCADA screen as a TAB within the main Screen Design Area, hold down the SHIFT key while double-clicking the screen name.
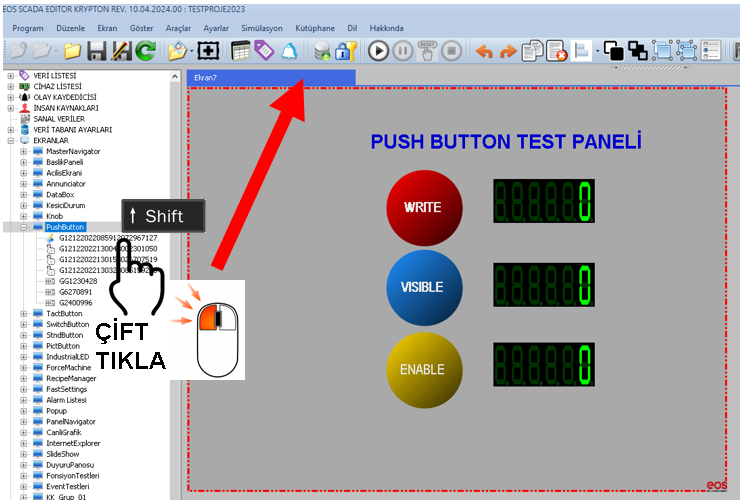
As a result of this operation, the selected screen opens within the TAB structure in the main design area. This allows the screen to be edited as part of the EOS SCADA Editor workspace.
TAB Mode provides a convenient working environment, especially when frequent access to design tools such as the tree menu on the left and the Settings Table on the right is required during screen design.
In this working mode, the screen design area and other editor components are located within the same workspace, allowing faster navigation between user control objects and screen properties.
Usage: Hold down the SHIFT key while double-clicking the screen name. The screen will open within the TAB structure of the Screen Design Area.
Full Screen Mode can be used to provide a larger working surface for the screen design area.
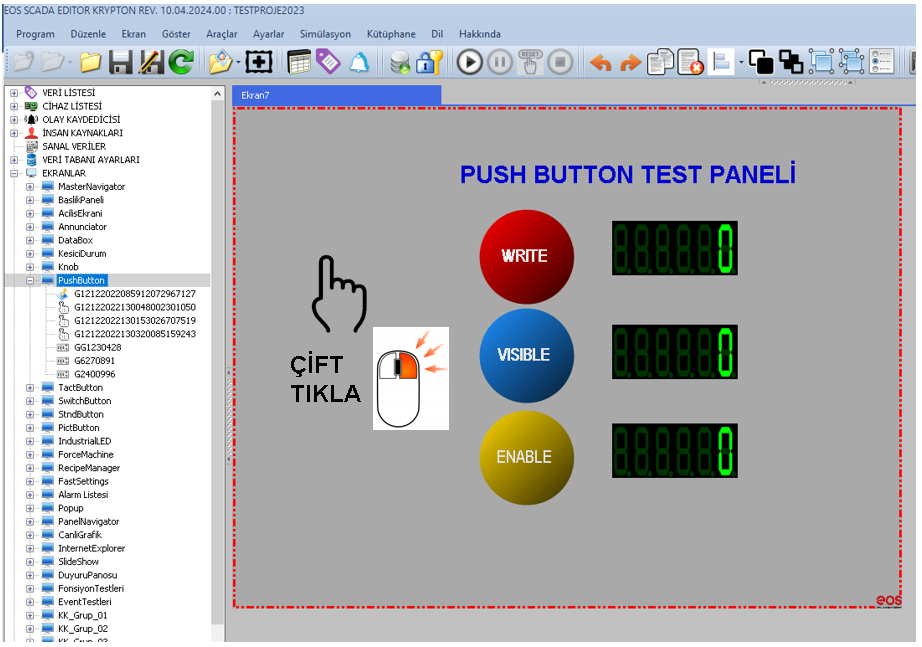
To enable Full Screen Mode, the screen must first be open in TAB Mode. In this case, double-clicking an empty area of the screen with the right mouse button activates Full Screen Mode.
Full Screen Mode allows the design area to be used more extensively, especially when editing large screens. This makes it easier to position and resize user control objects and to control the overall screen layout.
To exit Full Screen Mode and return to TAB Mode, simply press the ESC key.
Tip: Full Screen Mode can be preferred when editing SCADA screens containing many objects or when a larger working area is required.
After selecting the appropriate editing mode, visual screen design can begin. At this stage, the required graphical objects should be identified and placed on the screen by considering how the screen will be monitored and operated by the user.
During screen editing in EOS SCADA Editor, fundamental editing operations such as drag and drop, cut, copy, paste, moving, and resizing can be used.
The position and size of user control objects placed on the screen should be adjusted according to the requirements of the design. Object properties can be configured using the relevant settings tools.
Screen design should consider not only visual appearance but also the information and functionality that objects will provide to the user during operation. Therefore, the arrangement of objects on the screen should be as clear, simple, and purposeful as possible.
Basic approach: First, determine the overall screen layout. Then separate fixed and variable elements and add the required user control objects for the variable elements.
Before starting the design of a typical SCADA screen, it is useful to classify the elements that will appear on the screen as fixed and variable.
This classification helps determine which parts of the screen provide only a visual background and which parts will change according to real-time data received from the SCADA system.
In addition, properly separating fixed and variable elements can contribute to a more organized screen design and more efficient use of system resources, especially in large SCADA projects.
Fixed elements are graphical objects that do not change during normal operation after the SCADA screen is opened and help the user understand the variable elements displayed on the screen.
For example, plant buildings, roads, pipelines, tank structures, panel views, or other physical structures can be considered fixed screen elements.
Fixed graphical elements can be created directly within EOS SCADA Editor using the Background Design Tool. For more advanced graphic design requirements, they can also be prepared using graphic design software such as Microsoft PowerPoint, Adobe Photoshop, or CorelDRAW.
A fixed design prepared using external graphic software can then be added to the SCADA screen as a Background Image.
Instead of creating individual User Control Objects for graphics that will never change during operation, it may be preferable to combine them into a single background image.
This approach prevents the use of an unnecessary number of graphical objects and can help use computer resources more efficiently, especially in SCADA projects containing a large number of screens and objects.
Variable elements are screen components whose visual or audible properties can change according to real-time data collected from devices by EOS SCADA software.
These elements allow information collected from the field by the SCADA system to be presented to the user in a clear and efficient manner.
Examples of variable elements include displaying a measurement value numerically, changing the operating status of a motor, showing whether a valve is open or closed, or changing the color of a graphical object when an alarm condition occurs.
In EOS SCADA software, such dynamic elements must be placed on the screen as User Control Objects.
After the required properties of the User Control Object have been defined, real-time operation can be achieved by linking the SCADA data used or displayed by the object to the relevant data point.
Example: A graphical object representing a pump can be designed to have a different appearance when the pump is running, stopped, or in a fault condition. Therefore, the pump symbol is considered a variable SCADA element.
Visual and functional components that need to change during operation in EOS SCADA Editor are placed on the screen using User Control Objects.
User Control Objects can be used for various purposes, including displaying measurement values, monitoring device statuses, creating user commands, visualizing alarm conditions, and presenting various operational information to the user.
After a User Control Object has been placed on the screen, its position and size can be changed according to the requirements of the screen design.
The visual and functional properties of the object can then be configured using the relevant settings tools. If the object needs to operate with a data point in the SCADA system, it must also be linked to the corresponding data point.
In this way, the User Control Object becomes more than a graphical element displayed on the screen; it becomes a dynamic screen component associated with real-time data in the SCADA system.
To create SCADA screens that are organized, understandable, and maintainable, it is useful to perform the screen design in a specific sequence.
Each User Control Object used on a SCADA screen may consume a certain amount of computer resources during operation. Therefore, it is important to create only elements that actually need to be dynamic as User Control Objects.
Creating fixed graphics that will never change during operation as unnecessary User Control Objects can cause unnecessary resource consumption, especially on large screens and in projects containing a large number of screens.
For this reason, preparing fixed graphical elements within a single Background Image whenever possible can provide a more efficient screen design.
The resolution and file size of background images should also be optimized as much as possible. Files that are unnecessarily large can cause unnecessary disk and memory usage while screens are being loaded.
Adding fixed elements to the design as a fixed Background Image instead of User Control Objects can help use computer resources more efficiently.
It is recommended to keep the file size of prepared background images as small as possible. Where possible, the background image file size should not exceed 100 KByte.
Editing a SCADA screen created in EOS SCADA Editor consists of selecting an appropriate working mode, adding the required User Control Objects to the screen, sizing and positioning these objects, and configuring their properties.
Independent Screen Mode, TAB Mode, and Full Screen Mode can be used during screen editing. The user can select the mode that best suits the design task being performed and edit the screen accordingly.
Separating fixed and variable elements is important in screen design. Using fixed graphics that do not change during operation as a background image, while creating elements that change according to real-time data as User Control Objects, can provide a more organized and efficient design.
After completing the design, the screen should be checked in the Runtime environment to ensure that it provides a clear, simple, and functional user experience.
Especially in large SCADA projects, screen design should be evaluated not only in terms of visual appearance but also in terms of performance, resource utilization, readability, and ease of operation.
Free Software Download Center
Software for industrial data collection,
monitoring, and analysis.

Technical Support
Documentation, sample code, and
application-oriented information
for EOS software.
You can contact us regarding software, technical content, or collaboration.