
Free Software Download Center
Software for industrial data collection, monitoring, and analysis.
PASSWORD UPDATE • CURRENT PASSWORD • NEW PASSWORD • PASSWORD STRENGTH • DOUBLE CONFIRMATION • DB LED
Users logged into EOS SCADA Runtime can update their current SCADA login password by using the CHANGE PASSWORD function within Runtime. The password change operation is performed as a controlled process that verifies the current password and ensures that the new password complies with the applicable security rules.
Entering the new password twice allows the password specified by the user to be verified, while the password strength check applied by EOS SCADA Runtime prevents weak passwords from being accepted. The result of the update operation is reported to the user through the DB LED.
To change the password, the user must first be logged in to EOS SCADA Runtime. The logged-in user can click the user name in the upper-right section of the program screen to open the menu containing user operations.
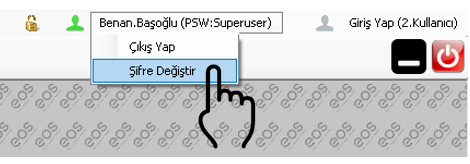
To start the password change operation:
In EOS SCADA Runtime, the password change operation is not completed with a single input. After the user enters the current password and the new password they want to set, the password update is performed through a double-confirmation process.
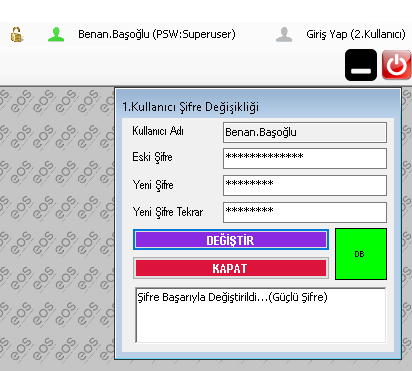
Basic steps of the password change process:
Entering the new password twice helps verify the new password specified by the user. This allows the password change operation to be performed in a controlled manner.
For user security, EOS SCADA Runtime has a password strength algorithm that evaluates the strength of the new password.
Passwords considered weak by the system are not accepted. This approach is a security mechanism designed to prevent users from setting passwords that can be easily guessed or that do not provide an adequate level of security.
Important: The password strength check applied by the system must be taken into account when setting a new password. For security reasons, EOS SCADA Runtime does not allow weak passwords that are considered insufficiently secure.
The result of the password change operation is displayed to the user through the DB LED in Runtime. The LED color provides visual status information indicating whether the password update was successful.
| DB LED Status | Meaning |
|---|---|
| Green | The password change operation was completed successfully. |
| Red | An error occurred during the password update operation. |
Therefore, after completing the password change operation, attention should be paid not only to closing the window but also to the DB LED status. A green LED indicates a successful update, while a red LED indicates that an error occurred during the update.
After completing the password change operation, the user can close the password update window by using the CLOSE button.
After completing the operation:
| Step | Operation | Result |
|---|---|---|
| 1 | Click the user name. | The user operations menu opens. |
| 2 | Select CHANGE PASSWORD. | The password update window opens. |
| 3 | Enter the current password. | The current user password is specified. |
| 4 | Enter the new password twice. | The new password is specified and verified. |
| 5 | Click the CHANGE button. | The double-confirmation process is initiated. |
| 6 | Check the DB LED status. | Green: successful / Red: error. |
| 7 | Click the CLOSE button. | The password change window is closed. |
Free Software Download Center
Software for industrial data collection, monitoring, and analysis.

Technical Support
Software documentation, sample code, and practical technical information.
You can contact us regarding EOS software, technical documentation, or industrial data communication.