
Free Software Download Center
Software for industrial data collection, monitoring, and analysis.
SOFTWARE CONFIGURATION
LIVE EVENTS is a utility software used in SCADA systems to access data and alarm archives, review historical records, and display live SCADA data.
Before LIVE EVENTS can be used at a plant, the software files must first be prepared, the relevant SCADA project database must be copied to the software directory, and the network addresses of the SCADA or Event Recorder servers must be defined in the configuration file.
Once the configuration is completed, LIVE EVENTS can access SCADA data and alarm archives through the configured servers. Higher availability can be achieved by switching to a backup server when the primary server is unavailable.
To start using LIVE EVENTS software, first extract the LIVE_EVENTS.rar file on the computer.
Extract the compressed file using WINRAR and make sure that a LIVE_EVENTS folder is created on the computer.
In order for LIVE EVENTS to access the SCADA data archives, the project database file used by the relevant plant must also be located in this folder.
Example: If the project database file used by the SCADA system is PLANT_NAME.FDB this file must be copied to the LIVE_EVENTS folder.
The SCADA system project database files are normally located under the C:\DataLogger\FDB folder.
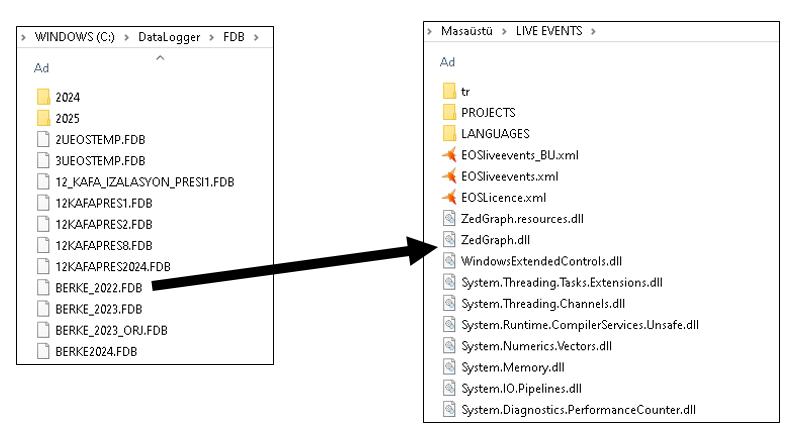
Locate the project database file belonging to your plant in this folder. The database file name may vary depending on the plant or project name.
For example, if the project database is named PLANT_NAME.FDB, copy the corresponding file into the LIVE_EVENTS folder.
Note: Make sure that the FDB file used by LIVE EVENTS is the correct project database used by your plant.
In order for LIVE EVENTS to access SCADA data archives and/or Event Recorder records, the network addresses of the servers responsible for archiving the data must be correctly defined in the EOSliveevents.xml configuration file.
The IP addresses of primary and backup servers can be defined in this configuration file. During operation, LIVE EVENTS first attempts to connect to the primary server. If the primary server cannot be reached, the backup server address is used.
This configuration is intended to maintain access to data archives and provide higher system availability when one of the servers is temporarily unavailable.
The main server connection parameters used in EOSliveevents.xml are described below:
The primary and backup IP addresses of the servers where SCADA data or Event Recorder records are archived at your plant must be entered in these fields.
When connecting to the configured servers, LIVE EVENTS first uses the primary IP address. If the primary server cannot be reached, it attempts to continue the connection using the corresponding backup IP address.
Open the EOSliveevents.xml configuration file using NOTEPAD or a similar text editor.
Replace the values of the DBHost1, DBHost1bu, DBHost2, and DBHost2bu parameters with the IP addresses of the SCADA or Event Recorder servers used at your plant.
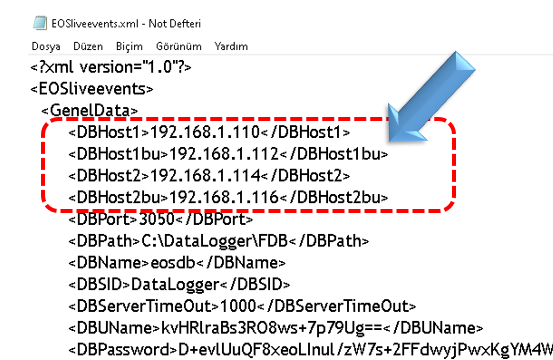
Save the XML file after completing the configuration.
Important: The IP addresses must belong to SCADA or Event Recorder servers that are accessible from the computer where the LIVE EVENTS application is running.
The following example defines two different SCADA or Event Recorder servers and their corresponding backup IP addresses:
<DBHost1>192.168.10.20</DBHost1>
<DBHost1bu>192.168.10.21</DBHost1bu>
<DBHost2>192.168.20.30</DBHost2>
<DBHost2bu>192.168.20.31</DBHost2bu>
In this example, LIVE EVENTS will first attempt to connect to the primary server at 192.168.10.20. If this server cannot be reached, the backup server at 192.168.10.21 will be used.
Similarly, for the second server group, the primary address is 192.168.20.30, while the backup address is 192.168.20.31.
The IP addresses defined in EOSliveevents.xml must be accessible from the computer where LIVE EVENTS software is installed.
Appropriate firewall and network routing rules must also be configured to enable communication between LIVE EVENTS and the SCADA or Event Recorder servers.
If network connectivity cannot be established, LIVE EVENTS cannot access the relevant data archives. Therefore, it is recommended to verify network connectivity between the servers before configuring the software.
If the LIVE EVENTS computer cannot access the SCADA or Event Recorder servers, the data archives cannot be accessed even if the IP addresses in EOSliveevents.xml are correct.
In systems where SCADA or Event Recorder servers do not have a backup IP address, the same IP address can be entered in both the primary and backup IP fields.
For example, if only 192.168.10.20 is available for the first server, the configuration can be made as follows:
<DBHost1>192.168.10.20</DBHost1>
<DBHost1bu>192.168.10.20</DBHost1bu>
Note: In systems without a backup IP address, the same IP address may be used in both the primary and backup fields. However, this does not provide actual server redundancy.
After the required files have been copied and the EOSliveevents.xml configuration has been completed, LIVE EVENTS can be started.
To do this, double-click the EOSLiveEvents.exe file located in the LIVE_EVENTS folder.
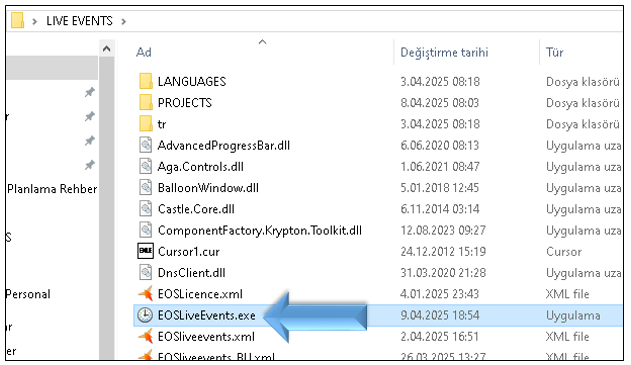
When the application starts, users can log in using the user accounts previously defined in the SCADA system.
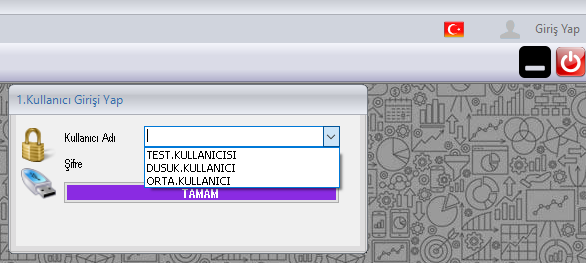
After the user login has been completed successfully, SCADA data and alarm archives can be accessed through LIVE EVENTS.
Depending on the system configuration, live alarm lists and live graphs can also be displayed.
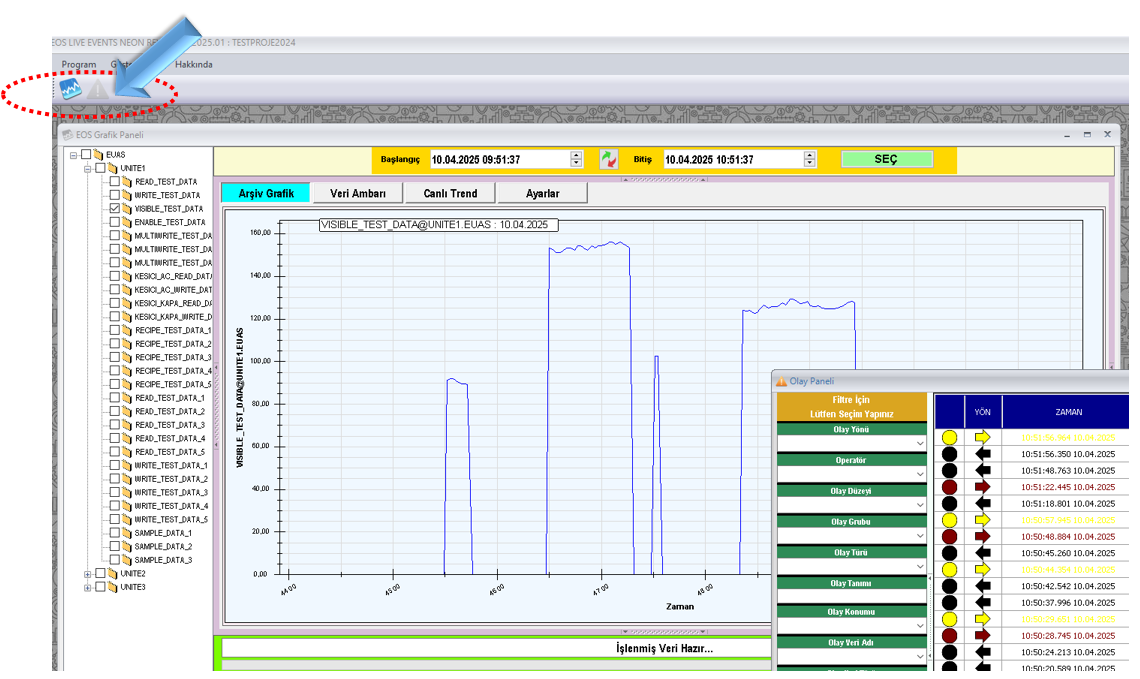
Information accessible through LIVE EVENTS:
LIVE EVENTS does not have to be run directly on the SCADA or Event Recorder system.
The software can be installed on another computer located on the same network as the SCADA or Event Recorder system, allowing archived data to be accessed from this computer.
With this approach, a separate DATA computer can be used to access archived data without requiring the SCADA server itself to be used as a user workstation.
Example: A separate computer can be assigned within the plant to run LIVE EVENTS. This computer can then be configured to access the SCADA and Event Recorder servers over the network.
The following sequence can be followed when deploying LIVE EVENTS on a new computer:
To use LIVE EVENTS, the software files must first be prepared and the project database belonging to the plant's SCADA system must be copied into the LIVE_EVENTS folder.
Next, the primary and backup IP addresses of the SCADA or Event Recorder servers must be defined in the EOSliveevents.xml file. DBHost1 and DBHost2 define the primary servers, while DBHost1bu and DBHost2bu define their corresponding backup servers.
Once the configuration is completed, EOSLiveEvents.exe can be started and the user can log in using an account defined in the SCADA system. Depending on the configuration, users can access SCADA data and alarm archives, live alarm lists, and live graphs.
LIVE EVENTS can also be installed on a separate computer located on the same network as the SCADA or Event Recorder system. This allows an independent DATA computer to be used for accessing archived data.
Free Software Download Center
Software for industrial data collection, monitoring, and analysis.

Technical Support
Documentation, sample code, and practical information about the software.
You can contact us regarding EOS software, technical documentation, or industrial data communication.